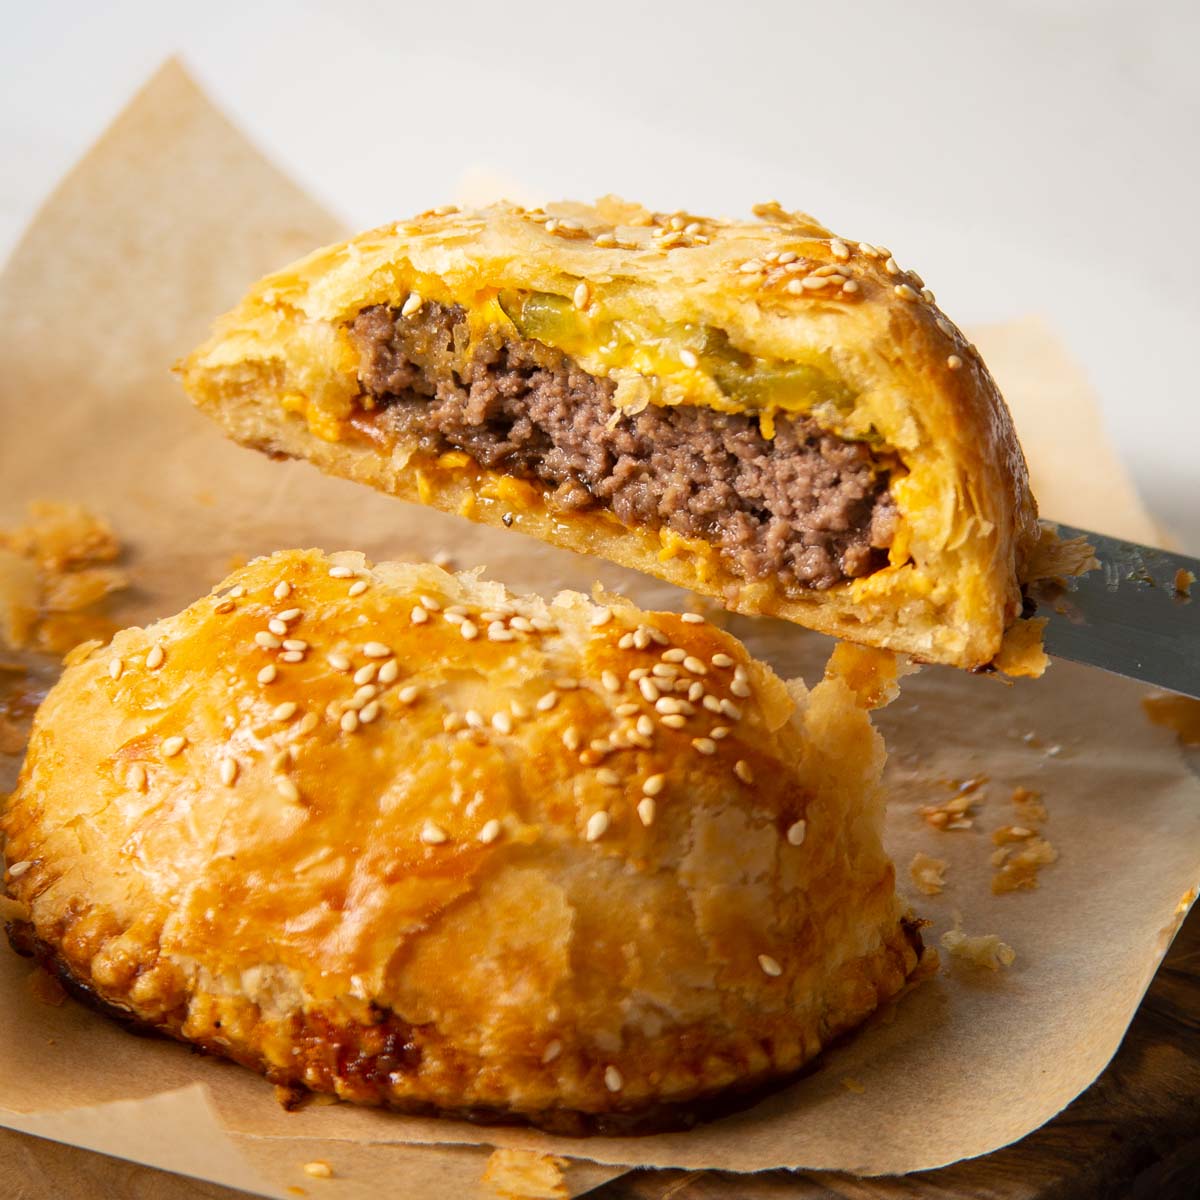
These Cheeseburger Wellingtons are outrageously juicy, cheesy and wrapped in golden puff pastry. Fun, easy and dangerously delicious!
If, like me, you love the idea of making a beef wellington, but quite frankly, you don’t have the willpower, then you’ve come to the right place. Not only are these ground beef versions much easier to make, but they’re beyond delicious, they’re the perfect handheld size and are amazing for so many occasions. Follow me…
Ground Beef Patties
Instead of making a sort of meatloaf-style wellington, we’ll be making burger patties and using them in the centre. I know what you’re thinking – ‘aren’t they going to end up dry?’ Thankfully, no. BUT, there are a few things you need to consider when preparing them:
- High fat – using beef that is at least 20% fat is important to ensure the patties stay nice and juicy.
- Feather fingers – don’t overwork the meat when you’re forming the patties. This will cause them to come out tough and dry.
- Thick – I like to make the patties a little thicker than usual, just to give a little more leeway (remember, they cook twice: once in the pan and once in the oven).
- Quick fry – when you fry them, make sure you don’t cook the patties all the way through. This step is purely just to create a crust on the outside.
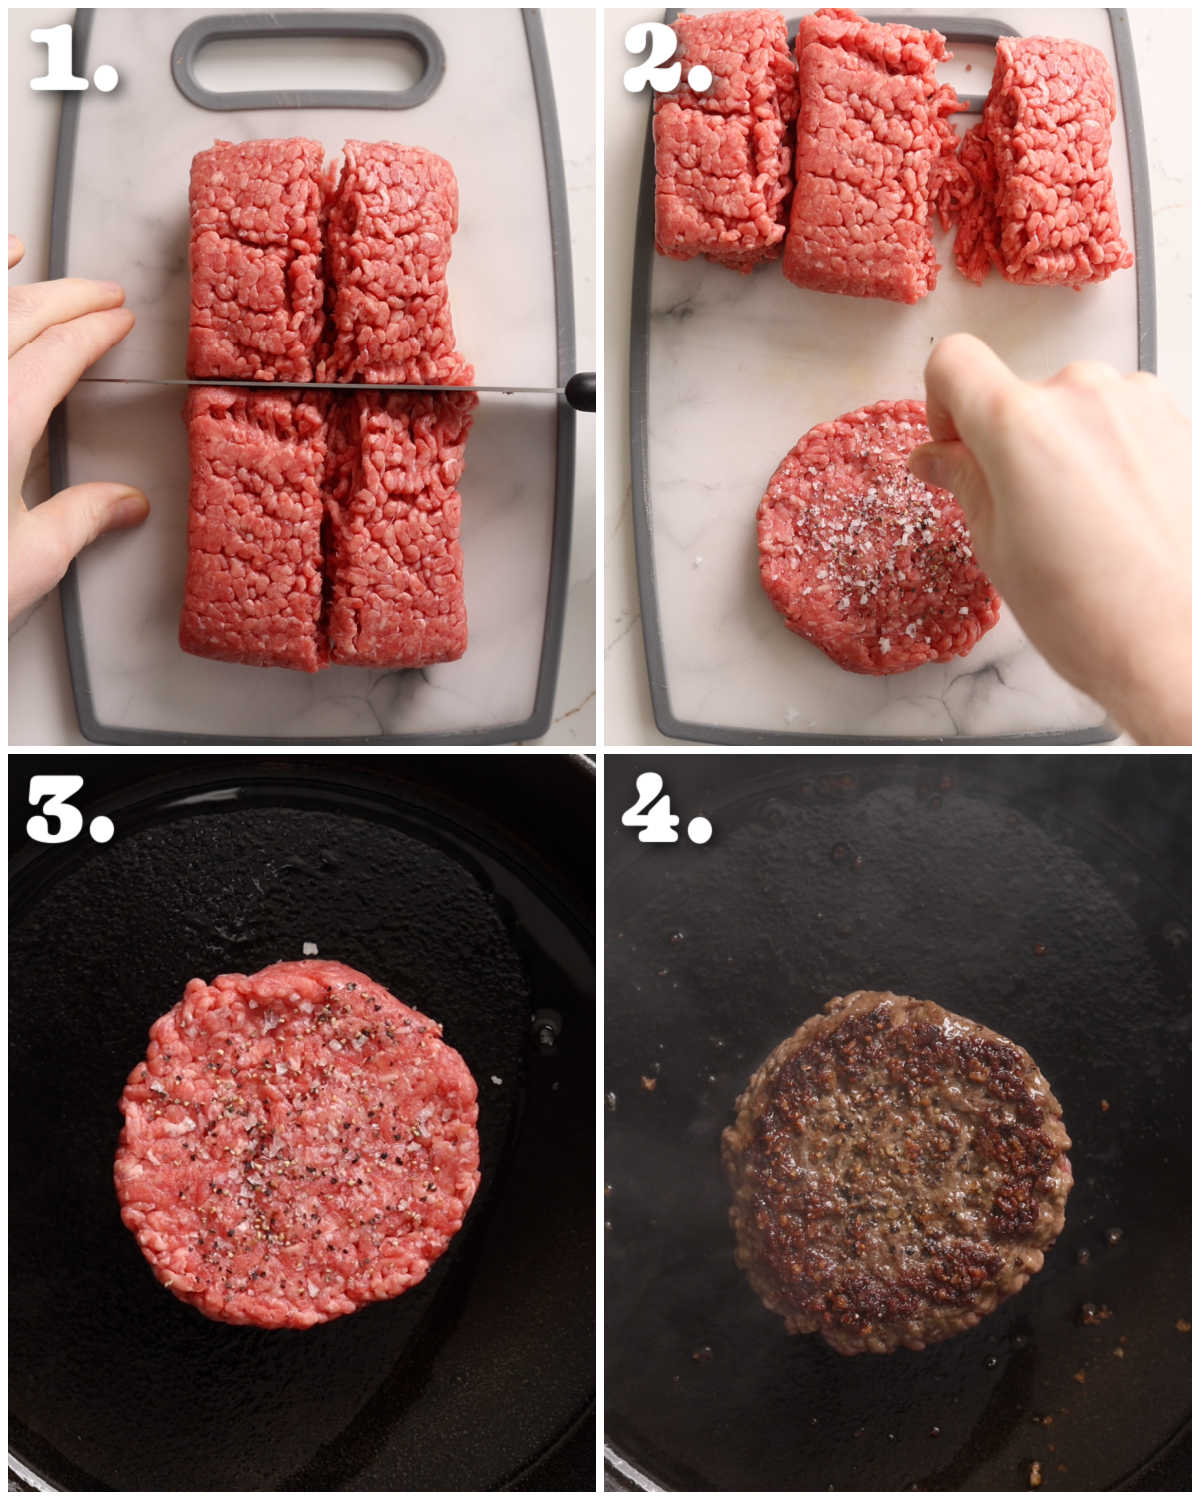
Process shots: slice beef into portions (photo 1), form into patties and season (photo 2), add to hot pan (photo 3), fry both sides (photo 4).
Recipe Tip #1
Once you’ve fried the patties, it’s essential to make sure they cool to room temp. This will prevent the patties from steaming the pastry, and thus making it very difficult to handle, and ultimately preventing them from ‘puffing’ up in the oven.
Burger Wellington
Like I’ve mentioned, these are going to be handheld Wellingtons. The easiest way to make them is to create a ‘base’ slice of pastry and a ‘top’ slice. Sandwiched in between those two layers is where we make the cheeseburger:
- Cheese – we’re going all out and using processed/American-style cheese. You can of course use a different cheese if you’d prefer.
- Onion – I like using a dollop of caramelised onion chutney, but you could use caramelised or grilled/pan-fried onions if you’d prefer.
- Patty – give this a pat with paper towels to remove excess oil/moisture if needed.
- Sauce – I love using Burger Sauce, but you could use your favourite sauce.
- Pickles/Gherkins – pat these dry to remove excess moisture.
You want to avoid fillings like lettuce or tomato, because they’ll just go soggy in the oven. Tomato, in particular, will also add way too much water to the inside and essentially steam the pastry and cause it to go soggy.
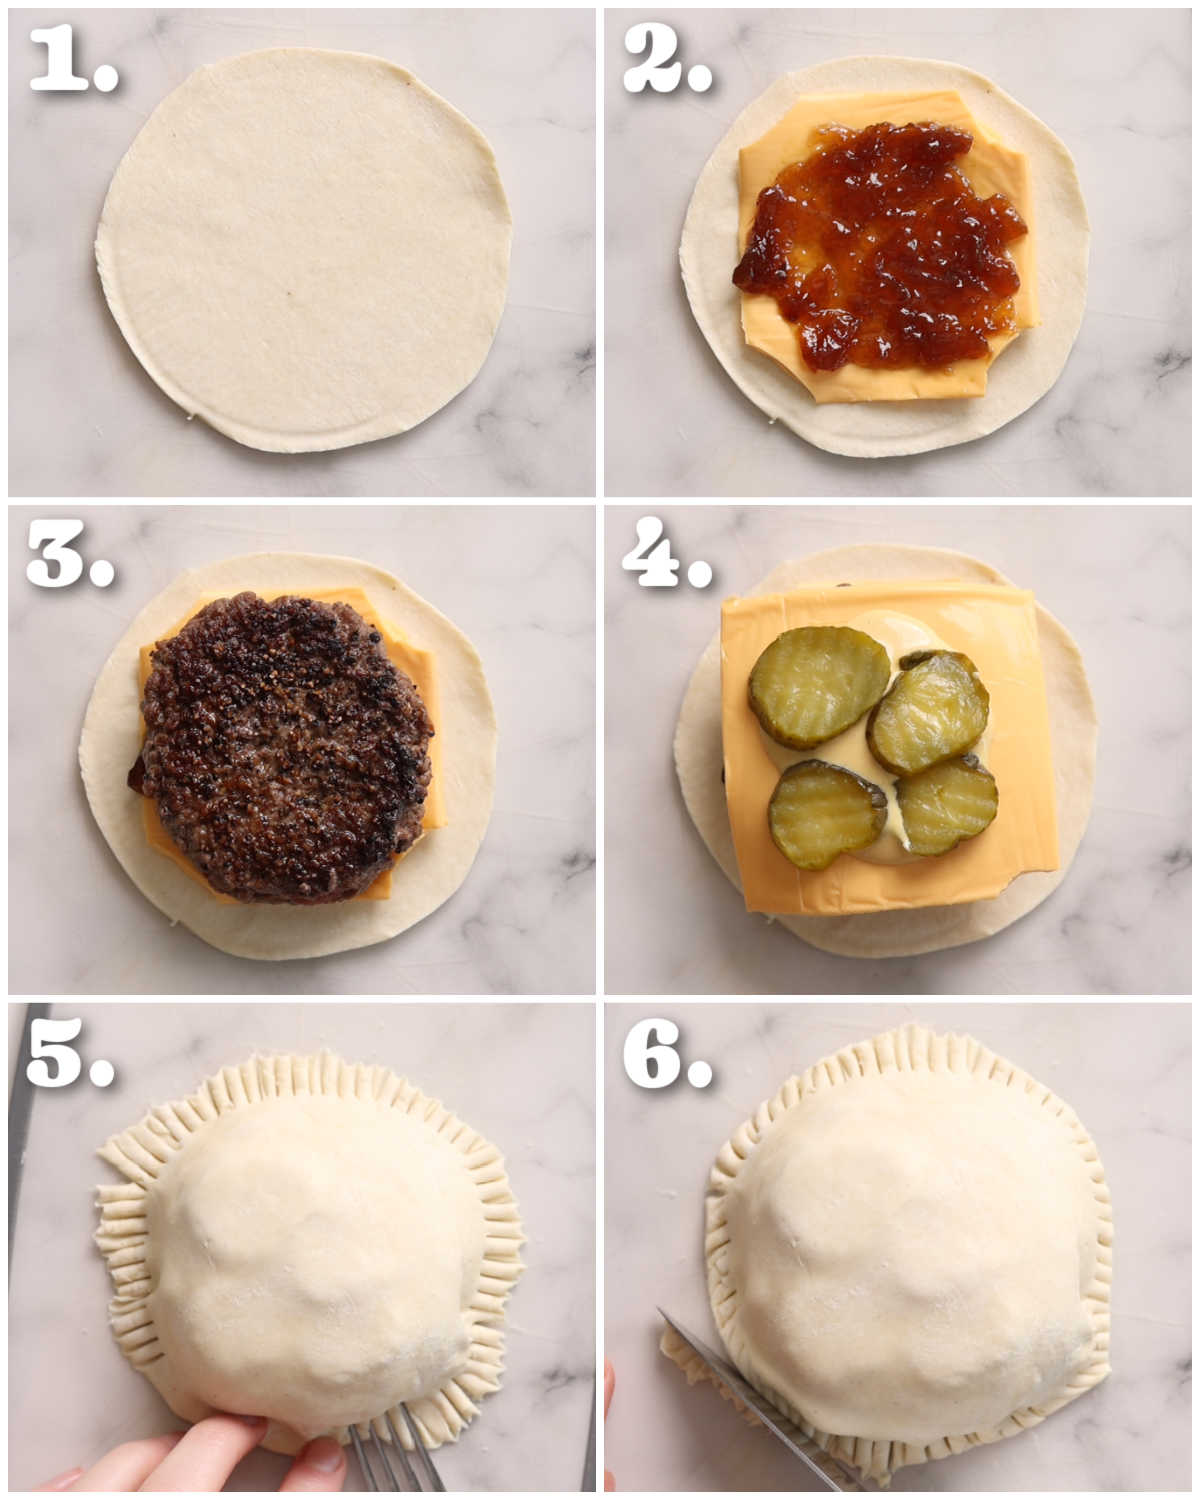
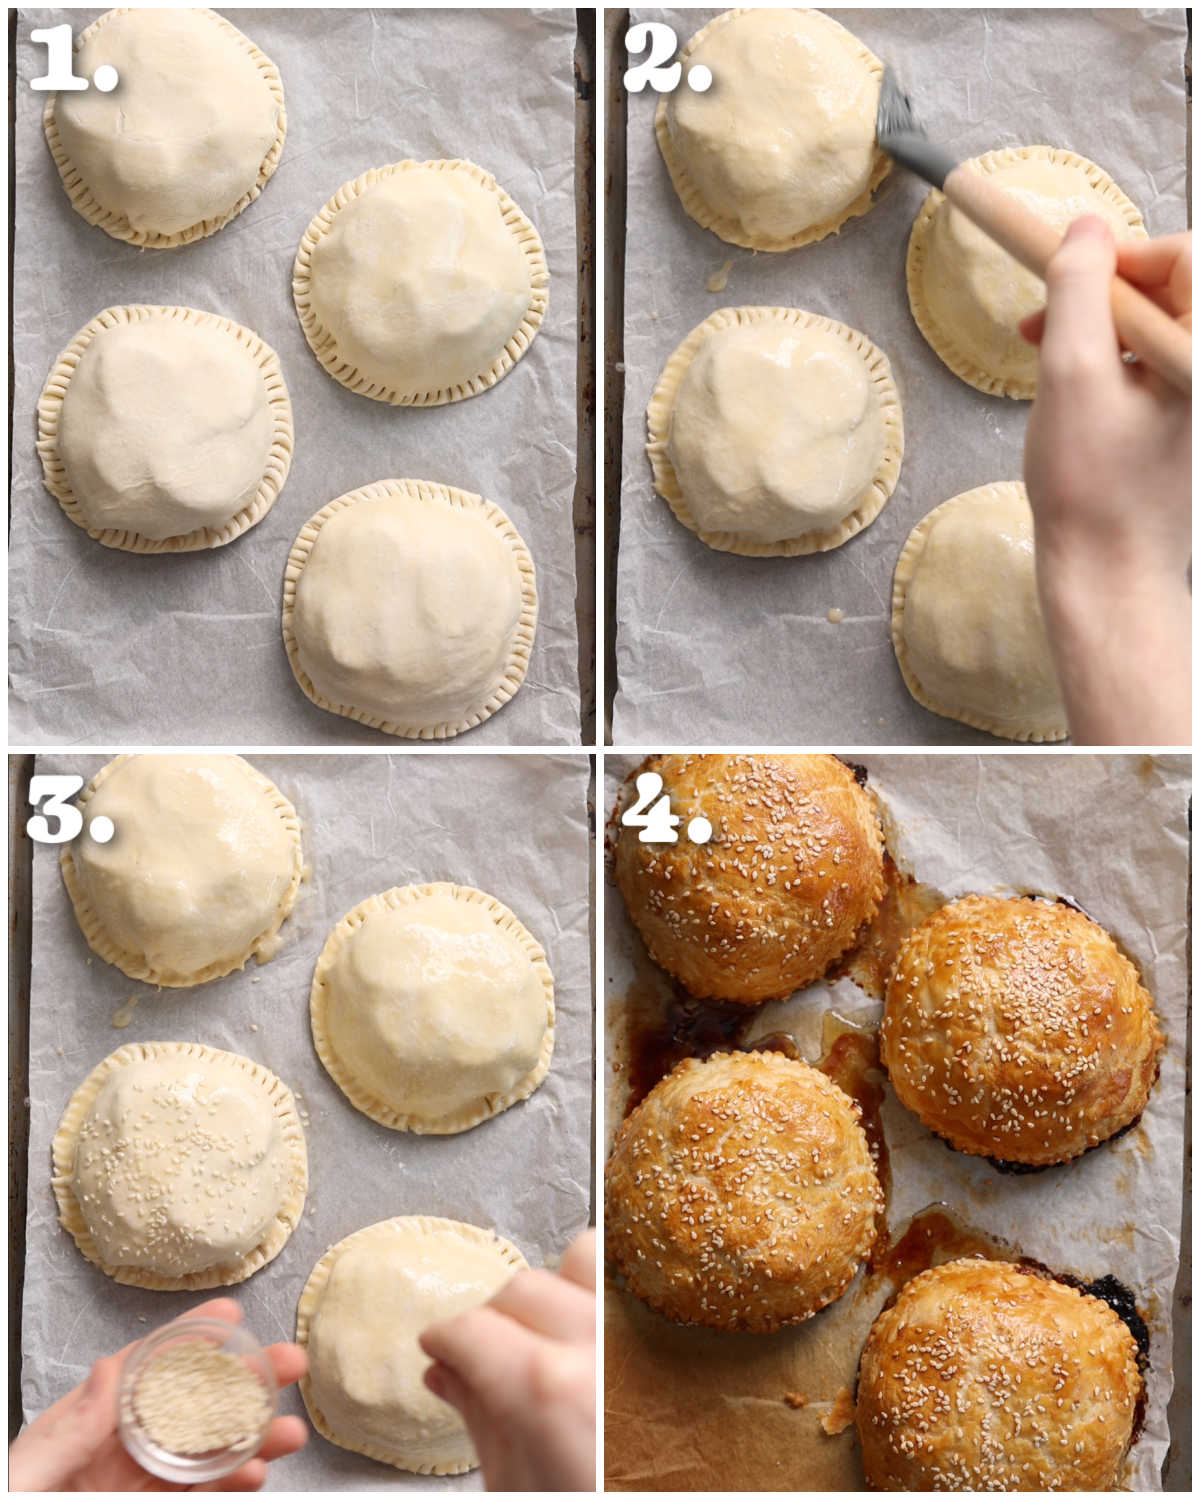
Process shots: slice pastry (photo 1), add cheese and chutney (photo 2), add patty (photo 3), add cheese and pickles (photo 4), add pastry then crimp and slice (photos 5&6).
Recipe Tip #2
Make sure the pastry is as cold as you can get it (whilst still being pliable). This will ensure the pastry puffs up.
How to cook Burger Wellingtons
Once you’ve made the wellingtons, you’re on the home stretch. All that’s needed from there is a little egg wash, some sesame seeds, and you’re good to go.
Just make sure you space them out on the tray; otherwise you risk them sticking together as they expand. I also highly recommend using parchment/baking paper for an easy clean up and to prevent the base from sticking.
Process shots: add to baking tray (photo 1), brush with egg wash (photo 2), sprinkle with sesame seeds (photo 3), bake (photo 4).
Recipe Tip #3
You can prepare these ahead of time, just make sure the patty has completely cooled, then make everything up to egg washing. Tightly store in the fridge overnight, then continue with the recipe.
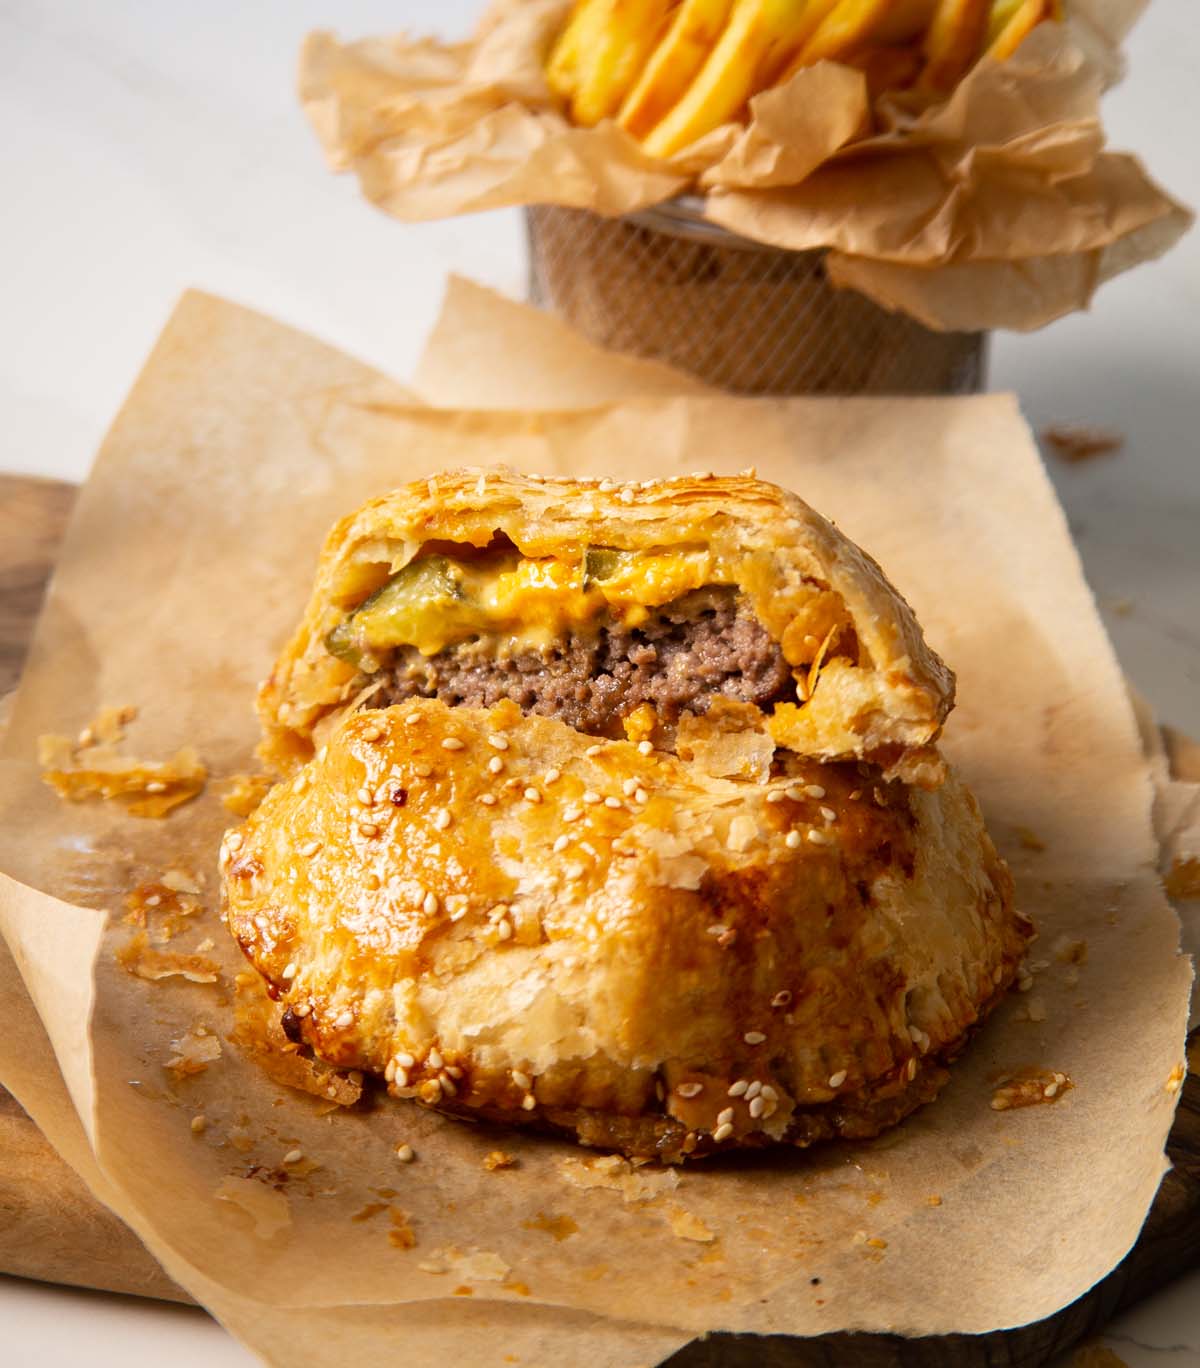
Serving Suggestions for Cheeseburger Wellingtons
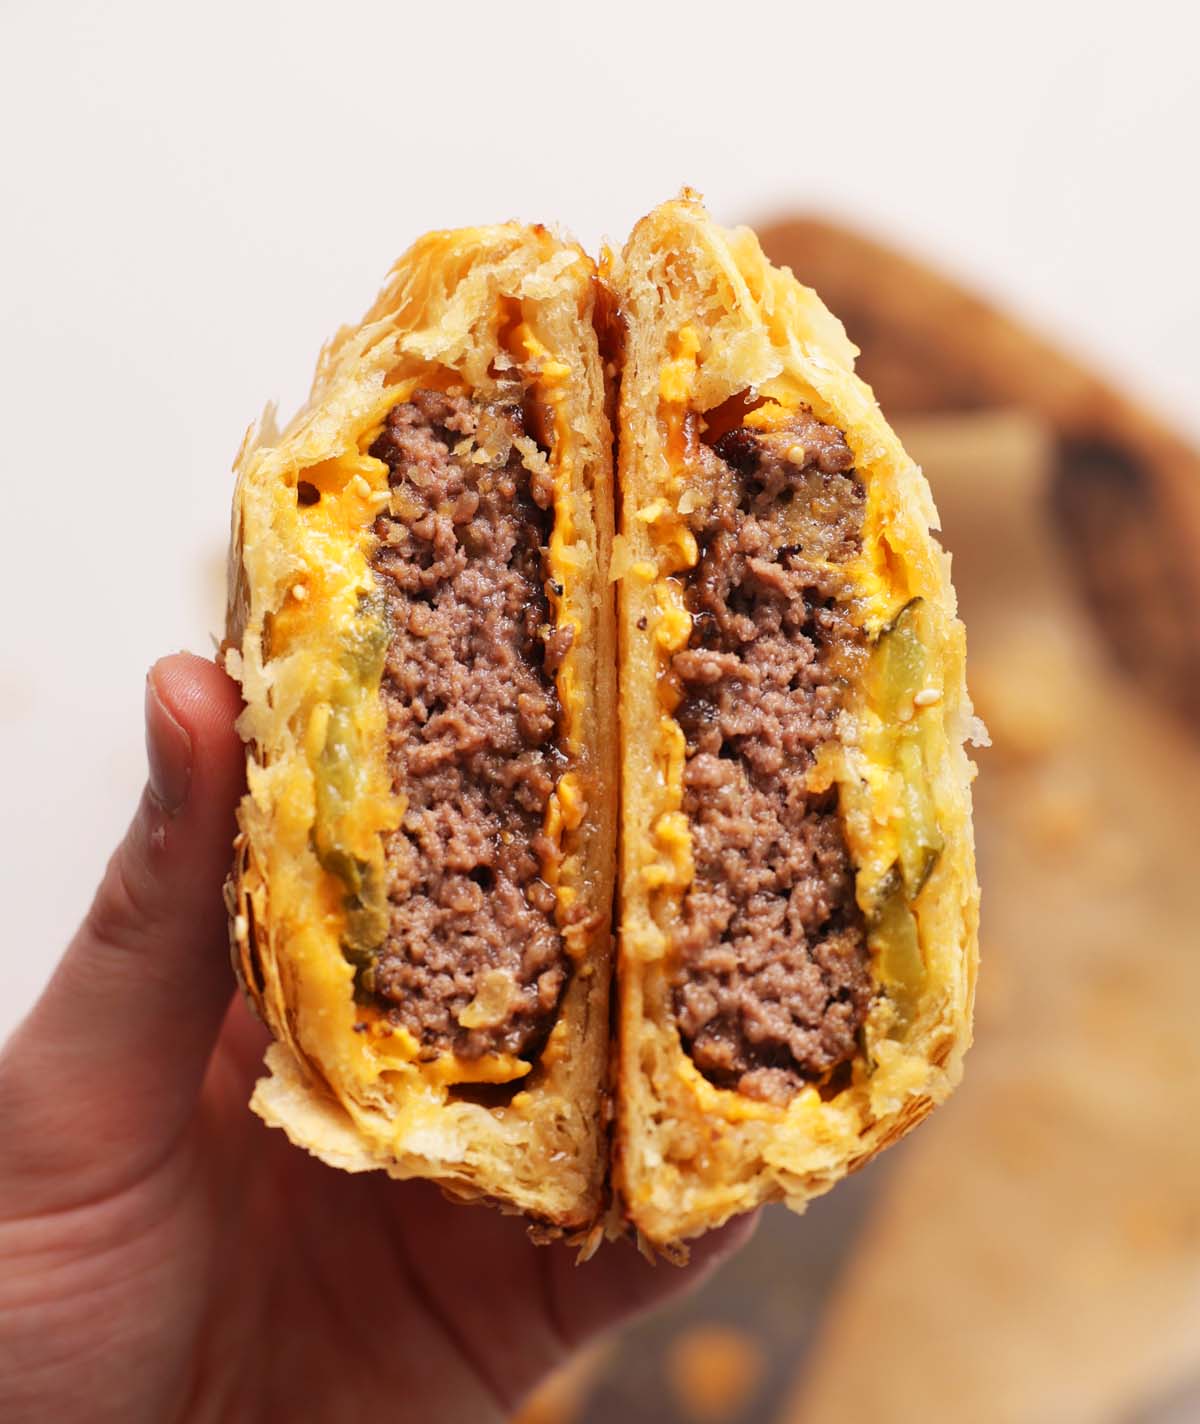
Once they’re out of the oven, the filling will be HOT. As such, leaving them for around 5 minutes isn’t a bad idea. From there, I typically slice them in half, then tuck right in!
These are pretty hearty as they are, but you could absolutely add a side or two if you’d like. Here are my favourites:
For more fun puff pastry ideas check out my Upside Down Tacos and Sausage Puffs!
For more cheeseburger recipes check out my Cheeseburger Burritos and Cheeseburger Waffle Fries!
Alrighty, let’s tuck into the full recipe for these cheeseburger wellingtons shall we?!
How to make Cheeseburger Wellingtons (Full Recipe & Video)
-
Sharp Knife & Chopping Board
-
Tape Measure (for patties/pastry)
-
Large Heavy-Based/Cast-Iron Pan & Turner/Flipper
-
Large Baking Tray & Baking Paper
-
Brush (for egg wash)
Prevent your screen from going dark
-
Preheat the oven to 400F/200C.
-
Slice the beef into 4 portions, then gently roll each one into a ball. Press each one into a patty that is 3.5″ wide (they should end up around 3/4″ thick). Don’t overwork the meat otherwise the patty will come out chewy (think feather fingers). Generously season both sides with salt and black pepper.
-
Place a large heavy-based or cast-iron pan over high heat. Add a drizzle of oil to the pan, then once hot, add the patties and leave for 1 minute and 30 seconds. Flip them over and fry for another 1 minute and 30 seconds, then remove from the pan. This isn’t to cook them right through, more just to get a nice crust on the outside. Leave the patties to completely cool to room temp (important otherwise they’ll steam the pastry). You may need to work in batches.
-
Slice 4x circles from the pastry that are 1/2″ wider than the patty (should end up 4.5″ wide). Slice 4x larger circles approx 1″ wider than the smaller circles. They need to be large enough to cover the whole burger and attach to the base circle.
-
Place a slice of cheese on each of the smaller circles (fold in the corners if you need to) then spread over 1 tbsp of chutney/caramelised onions. Pat the patties dry if they’re notably oily/wet and place on top of the onion, then add another slice of cheese on top. Spread some sauce on top, then add the pickles on top.
-
Drape the larger circles over the top and use a fork to crimp the outside into the bottom slice of pastry (try to close as tightly as you can without tearing). Use a knife to slice off excess pastry and clean up the outside.
-
Carefully place them on a large tray with baking/parchment paper. Brush with egg wash, sprinkle with sesame seeds, then slice a couple of small steam holes in the top. Bake in the oven for 25 minutes, or until deep golden and visibly flaky/crispy.
-
The filling will be very hot, so rest for a few mins then tuck in and enjoy!
b) Cold Pastry – it’s really important that the pastry is fridge-cold. Cold pastry puffs up far better than pastry that’s at room temp. Understandably the top layer of pastry can get difficult to mould if it’s too cold, so let that thaw a little if needed, but the bottom layer needs to be cold. I typically slice it and leave it in the fridge (or freezer if it’s warmed too much) until I need it.
c) Beef – to ensure the patties stay nice and juicy, you need to use high-fat beef. The initial frying is just to develop some flavour and build up a crust. Just another reminder to make sure you don’t overwork the meat, otherwise, the patties will come out tough and chewy.
d) Onions/Chutney – I just use store-bought caramelised onion chutney, but you could make some Caramelised Onions if you’d prefer, or, even just grill/fry some onions and use that if you don’t want the added sweetness.
e) Sauce – I love a dollop of Burger Sauce, but you could use any sauce you fancy. You only want a small amount inside the pastry. Too much liquid and the pastry will be soggy (you can serve more alongside at the end).
Calories: 1156kcal | Carbohydrates: 61.42g | Protein: 37.39g | Fat: 84.5g | Saturated Fat: 29.743g | Polyunsaturated Fat: 7.542g | Monounsaturated Fat: 39.944g | Trans Fat: 1.727g | Cholesterol: 163mg | Sodium: 1118mg | Potassium: 579mg | Fiber: 2.5g | Sugar: 5.56g | Vitamin A: 559IU | Vitamin C: 1.1mg | Calcium: 337mg | Iron: 5.77mg
PakarPBN
A Private Blog Network (PBN) is a collection of websites that are controlled by a single individual or organization and used primarily to build backlinks to a “money site” in order to influence its ranking in search engines such as Google. The core idea behind a PBN is based on the importance of backlinks in Google’s ranking algorithm. Since Google views backlinks as signals of authority and trust, some website owners attempt to artificially create these signals through a controlled network of sites.
In a typical PBN setup, the owner acquires expired or aged domains that already have existing authority, backlinks, and history. These domains are rebuilt with new content and hosted separately, often using different IP addresses, hosting providers, themes, and ownership details to make them appear unrelated. Within the content published on these sites, links are strategically placed that point to the main website the owner wants to rank higher. By doing this, the owner attempts to pass link equity (also known as “link juice”) from the PBN sites to the target website.
The purpose of a PBN is to give the impression that the target website is naturally earning links from multiple independent sources. If done effectively, this can temporarily improve keyword rankings, increase organic visibility, and drive more traffic from search results.